How to install a LED and heatsink into a Mag-Light
Steps to install a LED into the Mag-Lite
The design sketch below shows how the heatsink slug fits inside the D cell sized Mag-Lite and how it is used. The text is is the same colour as the part drawn in the sketch. This works best inside a D cell sized Mag-Lite due to the larger battery tube having more room for the light to reach the lens and also more room to install a LED Genie which can then protect against overheating. To make the light water proof just follow the steps in this guide to making a DIY dive light.
- Cut the battery tube of the Mag-Lite and throw away the switch section.
- Remove the threads inside the Mag-Lite head so the battery tube can be glued back on.
- You do not need to drill out the front of the Mag-Lite head if installing a LED. So this step can be skipped.
- You glue in the Lens shown in red on the sketch, you still need to waterproof the head with a stepped lens as per the normal guide. This extra lens is for making the light narrow, not for creating a water proof seal so it can be held in place with Silicon just enough to stop it moving.
- You solder on some wires to the LED star BEFORE you mount it onto the heatsink, otherwise the soldering iron heat will disappear into the heatsink and not melt any solder.
- Drill some holes through the heatsink to allow the wires to travel to the rear.
- Use arctic silver thermal glue to glue the LED star onto the heatsink pushing it down firmly to keep the layer of glue as thin as possible and to remove any air from under the star.
- Attach the LED's two wires to the LED Genie driver (you can not connect a battery directly to a LED, you need a driver like the LED Genie)
- Now you can power it all up and slide the heatsink with the LED mounted up and down inside the Mag-Lite You can choose if you want a wide or a narrow beam, then just fix the heatsink in place with a small amount of silicon glue, taking care not to get silicon between the heatsink and the Mag-Lite as you need metal to metal contact for the heat to travel to the water. If you want to change the focus you can cut the silicon and re-position the LED.
- If you are going to mount a Piezo switch, then this will need to be below the heatsink so that it does not block any light.
NOTE: It may be possible to use the existing switch hole for gluing in a Piezo switch and then you can use the threads and o-ring that are already on a Mag-Lite (less work needed to modify) allowing you to change the focus/zoom of the light during a dive. I believe this will be possible to do, however I don't like the idea of moving single o-ring sealed parts under water as it only takes a grain of sand to get under the o-ring and you have a leak. If you choose to have a play with doing that then please let me know the results after 50+ dives so I can update this page on how well the standard o-ring performs.
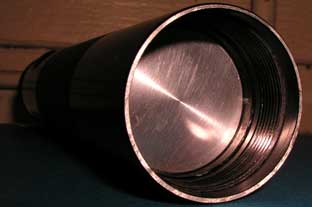
This picture shows the heatsink slug inside the Mag-Lite battery tube. Just needs the LED star mounted with thermal glue to the flat surface. If you want to upgrade the LED, just use some heat to soften the glue, wipe and sand any excess glue off and glue the new LED star onto the same heatsink.
Why make your own LED when MR16 LED globes are sold in shops?
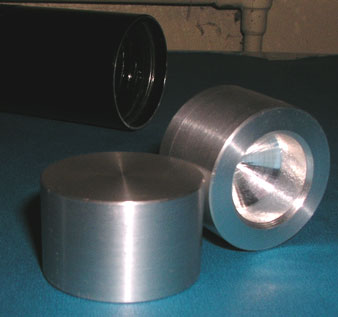
To cool an LED in a high powered dive light you need to transfer the heat from the small LED to the larger body of the dive light so that the water can keep the light's body and hence the LED inside cool. LED's create more light when they run cooler and can be permanently damaged if the LED temperature rises too high. It is for these reasons that an effective heatsink that fits tightly and has a good surface area in contact with the light's body is needed if you are to get the full potential out of any powerful LED. Ready made globes that are sold in shops that are MR16 drop-in replacements simply are not running to their full potential as they are designed to run below their rating (creating less light) in order to stay cool with nothing but minimal air cooling. If you want a bright LED, you must create your own with the best heatsink to transfer the heat into the water. You also find that ready made globes do not come in narrow <12 degree models, a narrow beam helps you to see further through the water. The pictures below show the heatsink's that I custom make to fit any LED mounted on a star to cool it effectively inside a Mag-Lite. Only one is needed, the photo shows you one from the side and another from the end which is drilled out to reduce the weight.
|
A single Heatsink for a D cell Mag-Lite, two are pictured
to the left to show different angles. If ordering other parts at the
same time then please contact me via email so I can give a single
freight cost.
|
 |
A pair (two) of cable glands with strain relief to suit cable between 6.5mm to 8.8mm. Thread is M16x1.5 and is 6mm long.
|
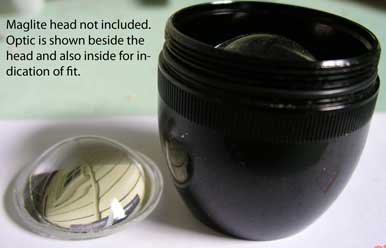 |
Now available and in stock. These are custom designed to fit the maglite and allow you to 'zoom' from a very narrow beam and all the way to a wide flood. Details are: 43mm diameter, 18mm thick and the focal length is around 26mm. Email for pricing. |