

 |
Logic Audio TutorialIt's so simple it's LOGICal |
Audio recording side of Logic
Contents |
Planned topics in here are... Tool tips...how to quantise audio .. how to turn audio into midi, and many more. There are reasons why Logic Audio is used by professionals world wide. |
Basic audio recording
The Logic Audio Tutorial starts here.
| Select an audio track in the ARRANGE WINDOW.....
Also check that the Audio track is assigned to the driver that
you currently have setup under "audio" "hardware
and drivers" ASI is short for ASIO...for instructions on how
to setup the ASIO drivers CLICK HERE |
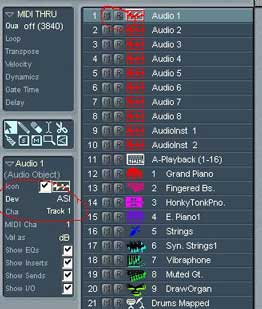 |
Select the correct InputThis is the most commonly asked question by new comers to logic
audio and the reason why I wrote this Logic Audio Tutorial. To see the Audio Object: doubleclick on the track, right where it says Audio 1. This should open up what is called the Environment window. (Logic Soundtrack and Logic AV doesn't have the Enviroment so to reach the mixer please go to the audio mixer via the menu ... "windows" then "open mixer") If you cant see the IO section then go "veiw" then "parameters" and tick the "Show I/O box. If you don’t have this option, it simply means that you have only two inputs, or that your inputs are “hardwired”, i.e., input 1 always goes to 1, input 2 to 2, etc.If you have only two inputs, then input 1 feeds all the odd numbered tracks and input 2 feeds all the even numbered tracks. |
 |
Record Enable the Track
please see the red circle on the Audio Object "Audio 1" When you Record enable a track for the first time, a file selector box will open automatically: This window is essentially asking "where do you want the audio file you are about to create stored on your hard drive and what do you want it named?" This procedure is generally referred to as "setting the Record Path". You only have to do this once. The program will then continue to use this record path until you decide to set a new one. Once the audio object is record enabled, the level meters on the audio object should respond to incoming signal. If they don’t, check that all of the hardware connections are correct and intact. |
|
Start Recording
|
 |
Stop Recording
When you’ve finished recording, hit the Stop button on the transport
or your computer’s 0 INS key. If everything is working properly,
a progress bar
window will show up in the upper left hand corner of your screen which
displays
"Creating Overview". When it is finished, you should see a rectangular
object
with a waveform display in the main part of the Arrange window. You may
need to zoom in on the object to see the waveform.
Playback the recording
Click the Stop button (or 0 INS key) again. This should return you to
bar 1 of
the song. Now hit the Play button on the Transport (or your
computer’s ENTER key). You should now hear the material you just
recorded. If you don’t, try disabling the Record Enable button and
trying
again. If you still don’t hear anything, run through these steps
again very carefully
to try and trace the source of the trouble.
Adding a prerecorded file to the arrange window
Adding audio files is done via the Audio Window
1. Select Window -> Audio Window -> Add Audio File
2. Select the audio file from the resulting File Selector window
The file, is then added to the list of files and regions in the Audio
Window.
If you wish for it to be placed in the song:
3. Click-hold on the Region name and drag it into Arrange window.
The Region will be placed at the position of your cursor when you release
the
mouse button, so watch the’Control Line' as you drag it in to see
where you're
placing it.
In version 4 and up the audio window is found under the AUDIO menu.
TIP A much quicker way to add files to the arrange window is to select the PENCIL tool from the toolbar and click in the arrange window where you want the file whilst holding down the SHIFT key. A box then opens asking you which file to insert.
Matching a Songs (midi) tempo to a Audio file
Matching song and audio file tempos......
A lot of dance music involves importing drum loops or musical samples
which have
their own inherent tempo. This necessitates matching the tempo of the
audio file
with the tempo of the song. This can be achieved in one of two ways: changing
the
tempo of the sequence to match the audio file's tempo or; changing the
tempo of
the audio file to match the tempo of the song. I will only put the first
method here.
Changing the tempo of the song to match the audio file’s tempo
Setting the song’s tempo to match the audio file is the easiest option
because it does
not involve any processing of the audio file. Logic has very simple method
for determining
the tempo of the audio file.
1. Select the region for the audio file you wish to determine the tempo
of
If you haven't done so already, import the audio file you wish to work
and
drag it into the Arrange window to the desired start location, as per
the
instructions the previous section, "".
N O T E For this example we are assuming that the audio file in question
is already trimmed so that it loops perfectly after an even number of
beats.
Furthermore, you should know how many beats long the audio loop is.
2. Set Cycle to the desired number of beats
Starting at the beginning of the audio region, define a Cycle region that
has
the same number of beats as the audio file does inherently. For example,
if
you placed an 8 bar loop at bar 5, click-drag in the upper portion of
the Bar
Ruler to create a Cycle that starts at bar 5 and ends at bar 13. (It's
not important
that Cycle be on, we're only using this as an easy method for setting
the
left and right locators)
3. Arrange Window -> Functions -> Adjust Tempo using object length
and
Locators
Make sure that the Region in question is still selected then choose the
option
4. Choose to insert the tempo change globally or locally
• Choose Global if you want the whole song to be set to the new tempo
• Choose Create if you want to insert a new tempo event at the beginning
of the Region
If you use a lot of samples or need to cut and paste you will soon learn that logic has a grid that it will lock to. This can make life both easier and much harder if you dont know the trick to getting around the snap. After clicking and holding with the mouse button hold down ALT and the snap is now to the closet Devision. Hold down SHIFT and ALT and the snap will be to the closest clock tick which is very fine. This works for just about everything in Logic, remember the two keys to give you more control.
Mixdown to a stereo file, ready to burn to cd.
After getting all the tracks at the right level and sounding just right you will probaby want to mix down all the files to a single wave file so that your new masterpeice can be burnt to a CD. To do this open up the mixer by going WINDOW>OPEN MIXER scroll along to the MASTER section of the mixer and down the bottom of the fader is a button with BNCE on it...This is the bounce button...Press the button...a window will pop up asking a few questions..Make sure 16BIT is selected and the wave file will be INTERLEAVED and not a split stereo file to keep it simpler for you when burning to cd....next enter the name of the file and the location of where you want the mixedown file to be placed....hit the bounce button on the screen and the song will play in realtime and the file will be created. I may write a page on how to use logic to dither correctly but I dont have the time right now, if u want to know read the manual. If you dont have a manual then buy the software.
Thats all there is to it !!! See my MIDI page for information on how to turn midi to audio and how to bounce this down
Logic audio stores its files in a very easy to understand way. The Song is saved to a LSO file which hols all the mixer settings, FX settings and all the MIDI information which includes automation. This file holds everything except audio files which is obvious why it doesn't. The audio files that Logic uses are linked from the LSO file. So to make sure that backups work very smoothly then follow these steps when setting up a song.
1. In windows explorer make a new directory/folder in the hard drive that you record to. I use D drive and create a folder that has the name of the song that I will be creating.
2. Copy all files that you are going to use in the song into the folder made in step 1.... doing this before using the files in logic will prevent a file in C drive being linked to which after formatting will not be there anymore. Files that you may use include Loops and samples, I record everything from scratch so this step I rarely perform.
3. When you record arm a track set the record path to the folder created in step 1.... All recorded files will be placed in the right place now.
4. Dont forget to save the LSO file also to the folder in step 1 and thats all there is to setting up a new song in logic audio.
If you follow those steps then you can burn the folder to a CD and then delete the folder off the hard drive to free up space. When you want to work on it again say in 6 months time you just copy that folder back to the hard drive. Since CD's are read only you will then need to unwrite protect all the files in the folder or logic wont allow you to save or make destructive edits on any of the files. To do this just right click on a file and select properties then untick "read only"
These tips should be used with caution as they will delete files off your disk, if done right they will remove un-needed files saving space and allowing more work to be backed up to one CD.
First one is to remove all un needed work from the arrange page. Then go to the Audio window from the Audio menu and select all used files. Press the delete key and all the files will disappear from the audio window NOT FROM THE DISK. the next step is to use the Optimise command to delete all files not in the audio window off the folder that you have set as the record path.
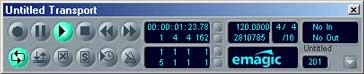
Autopunch in is probably one of the most used features of any DAW. There are many ways this can be used so I will explain only one of them. You can work out the way u prefer to record. First loop the area you want to drop in. Use the loop button on the transport bar then click and draw a looped region on the time ruler at the top of the arrange window. The loop button is the one which has been depressed in the picture below. I recommend loop at least 1 bar either side of the drop in point so you can get the timing of the track before going into record. Up the top of the arrange window is the RULER. At the top of the ruler you will see the looped area highlighted. To change the Looped area, click and drag the bottom corners of the bar to the area that you want to be loop. Read the snap tips above. Next on the transport bar press the autopunch button (its next to the loop button) and you'll notice that just under the looped area in the ruler there will now be an extra space for drawing in a autopunch in bar. Once I add a picture here all of this will be very easy to follow. Arm the tracks u want to record to and start rolling. Pretty simple once you know how.
TIP by holding down the record button a list of options will pop up and you can select different ways of recording while looping.
If you enjoyed this logic audio tutorial then heres another site to check out.